Embroidery machines are a great way to create intricate designs and patterns with ease, but sometimes things can go wrong. One of the most common issues that you may encounter when using an embroidery machine is birdnesting. Birdnesting happens when the thread on the underside of the fabric becomes tangled, resulting in a messy and unattractive stitch. In this article, we will discuss how to fix birdnesting on an embroidery machine so that you can achieve the perfect stitch every time.
What is Birdnesting?
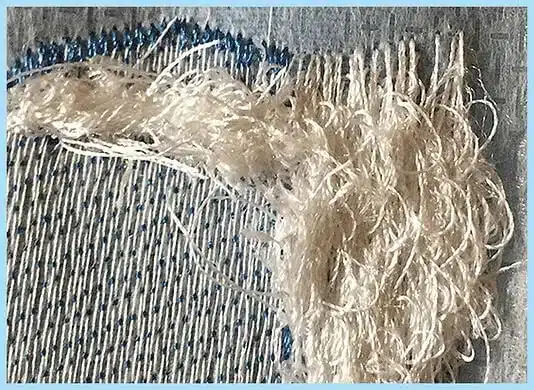
Before we dive into how to fix birdnesting, let’s first understand what it is. Birdnesting occurs when the thread on the underside of the fabric becomes tangled, resulting in a knot of thread. This can happen for a number of reasons, including:
- Incorrect tension settings
- Wrong needle size
- Dull or damaged needle
- Improper threading
- Poor quality thread
- Incorrect hooping technique
How to Fix Birdnesting on an Embroidery Machine
Now that we know what birdnesting is and what causes it, let’s discuss how to fix it. Here are some steps you can take to prevent and fix birdnesting on your embroidery machine.
- Check the Tension Settings
The first step in fixing birdnesting is to check the tension settings on your machine. The tension settings control how tight or loose the thread is, and if they are not set correctly, you may experience birdnesting. Check your machine’s manual for the recommended tension settings, and adjust them as necessary. You may need to experiment with different settings to find the right one for your project.
- Check the Needle Size
Using the wrong needle size can also cause birdnesting. Make sure you are using the correct needle size for your project. If you are unsure which size to use, refer to your machine’s manual or consult with an embroidery expert.
- Check the Needle
A dull or damaged needle can also cause birdnesting. Make sure your needle is sharp and in good condition. If it is dull or damaged, replace it before continuing with your project.
- Check the Threading
Improper threading can also cause birdnesting. Make sure the thread is properly threaded through the machine and the needle. Refer to your machine’s manual for proper threading instructions.
- Check the Thread Quality
Poor quality thread can also cause birdnesting. Make sure you are using high-quality thread that is suitable for your project. Cheap or low-quality thread may not hold up well during the embroidery process and can cause birdnesting.
- Check the Hooping Technique
Incorrect hooping technique can also cause birdnesting. Make sure the fabric is properly hooped and that it is not too loose or too tight. The fabric should be taut but not stretched.
- Clean the Machine
Dust and debris can build up in your embroidery machine, causing it to malfunction and possibly cause birdnesting. Regularly clean your machine to prevent buildup and ensure it is functioning properly.
Preventing Birdnesting on an Embroidery Machine
In addition to knowing how to fix birdnesting, there are also steps you can take to prevent it from happening in the first place. Here are some tips for preventing birdnesting on your embroidery machine:
- Always use high-quality thread that is suitable for your project
- Use the correct needle size for your project
- Make sure your needle is sharp and in good condition
- Properly thread your machine and needle
- Use the recommended tension settings for your machine and project
- Hoop your fabric correctly
- Regularly clean your machine
Related Posts
Discover relevant articles, tutorials, and tips to improve your skills and explore new techniques.
Stay inspired and connected to our embroidery community.


