1 Format and basic manipulations
This little primer shows how to use InkStitch to create fills, strokes, and simple zigzags. Creating satin columns is more complicated and will be explained in InkStitch – satin columns. Wavy embroidery and lettering are also introduced in separate articles.
It is important to know that Ink/Stitch only accepts the digitization of paths (Engl. “path”), a particular type of SVG element which allows to define any shape with a “path” language which includes by example of Bézier control points.
Before explaining how to use the Ink/Stitch extension, we will introduce some basic notions concerning the SVG format and the InkScape drawing software. If you are not interested in technical explanations, you read the following chapter diagonally and then closely follow the next one which explains how to digitize a background (fill) and an outline (stroke).
1.1 SVG objects
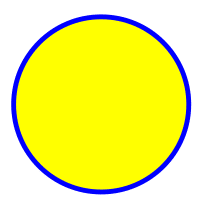
In InkScape, any graphic object is defined by SVG code, a language invented in the 1990s to create graphics. SVG is part of HTML5. You can therefore open an Inkscape/Inkstitch file in a web browser and see the design (not the embroidery simulation). CTRL-U (View Page Source) allows you to quickly look at SVG code. It’s easier than using the XML editor in InkScape. Try ! Click on the PNG image below until an SVG page appears (direct access). Then look at the code with CTRL-U.
Yellow circle with blue border
Here, we will not explain how to use Inkscape. There are many tutorials on the web that do this, including in InkScape: (Help Menu -> Tutorials
Ink/Stitch allows (via a GUI interface) to add stitching parameters to an SVG object that indicate how to stitch the SVG object. This object needs an SVG element of type “path” (in French “chemin”, e.f. Arbitrary shapes with path in our static SVG tutorial) for technical details on the SVG standard. A machine then translates these parameterized objects into an embroidery plan (which can be viewed or not) which will define all the points that the machine will have to sew. This plan will then be exported in the machine format of your choice.
Remember the distinction between:
background (or filling, fill in English) and
outline (or line, stroke in English).
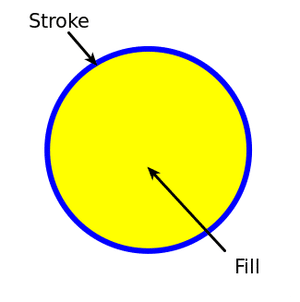
A drawing object is composed either of a background, or an outline, or both.
A circle with a yellow fill (background) and a blue outline
A circle with yellow fill and blue border
Here is an example of an SVG code that defines this circle, one using the SVG circle element
<circle
style=”opacity:1; fill:#ffff00; fill-opacity:1; stroke:#0000ff; stroke-width:5.92615652; stroke-miterlimit:4; stroke-dasharray:none; stroke-opacity:1″
id=”path4147″
cx=”123.99713″
cy=”650.45123″
r=”106.87944″ />
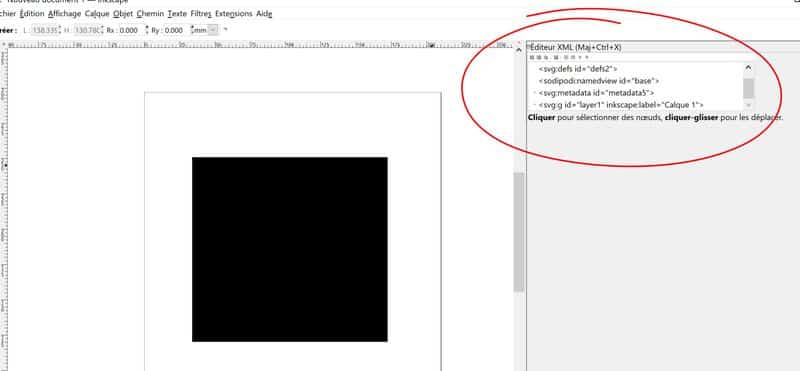
In InkScape it is possible to open the built-in XML tree editor if you want to check the code (CTRL-SHIFT-X). It is also possible to edit SVG code with a programming editor, but it is not necessary to make drawings. Knowing how to read code will simply help you understand what is going on.
XML editor window
XML editor window
Most SVG objects cannot be stitched directly, especially fonts and primitive objects (circle, square, etc.), but they can easily be transformed into a path (Engl. path) as explained below.
1.2 Convert a “primitive” object to a path
A priori you should transform all the objects you want to embroider with InkStitch into a path (that said Ink/Stitch has become a little more tolerant):
Select all objects with keyboard shortcut CTRL+A
Then run menu Path > Object to Path (Angl: Path -> Object to Path)
An SVG path is represented using letters to define operations and numbers for positions, distances, etc. (mechanism which also includes Bézier curves and Arcs). You don’t need to understand how it works. You just have to make sure that each object you would like to sew is represented by a path, ie. the SVG path element. To verify this, open the XML editor and click on the object in the working scene. The XML code will be highlighted.
Here is the same circle (see above) transformed into “path” format
<path
style=”opacity:1;fill:#ffff00; fill-opacity:1; stroke:#0000ff; stroke-width:5.92615652; stroke-miterlimit:4; stroke-dasharray:none;stroke-opacity:1″
d=”M 230.87657,650.45123 A 106.87944,106.87944 0 0 1 123.99713,757.33067 106.87944,106.87944 0 0 1 17.117691,650.45123 106.87944,106.87944 0 0 1 123.99713,543.57179 106.87944,106.87944 0 0 1 230.87657,650.45123 Z”
id=”path4147″ />
Objects that are not of type path are ignored by InkStitch! If you want to know more
1.3 Setting the SVG path for embroidery
Recall that Ink/Stitch annotates the code of the objects you see on the screen with instructions that indicate how to generate the stitches to embroider. Select at least one object then play around with the settings available in the Extensions -> Ink/Stitch -> Settings menu.
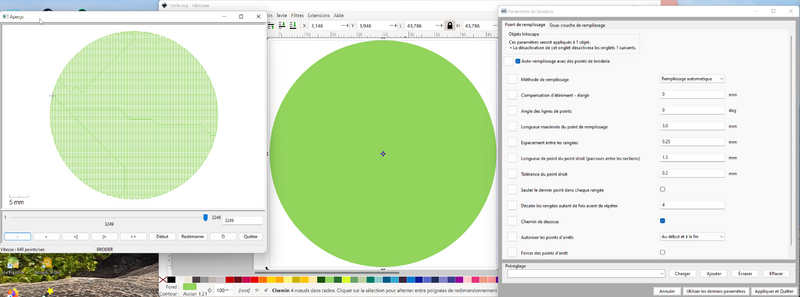
To start, the easiest way will be to accept the default settings. We will come back to this in detail in the next section. We’ll also learn later how InkStitch adds properties to SVG paths to define how stitching objects should be generated based on each design. Here is a simple green circle and its default setting:
Default setting of a green background
A slightly more sophisticated example will be discussed in the next chapter below.
1.4 Inspect the embroidery plan in Inskape
It is important to know roughly
It is possible to visualize what is called the embroidery plan. It will be included in a new layer which you can then hide or kill. The plan allows you to view the stitches in detail. Otherwise, it is also possible to use the simulator (see below) or an embroidery viewer instead.
Extensions -> Ink/Stitch -> View & Export -> Preview Stitch Plan
Select the layer with the embroidery plane and hide the others (this should be done automatically after using the Embroidery operation).
Select the Edit Nodes…
Enlarge view
If we look at the SVG code, we can see that our paths are now annotated with stitch-specific information. Additionally, the new Plan Stitch layer contains two huge object paths – one for the border and one for the fill – which define all the stitches that will be sewn, not to mention the stroke color for both. Note that since the circle has been separated into two objects with strokes, there is no more fill.
1.5 Simulation of embroidery
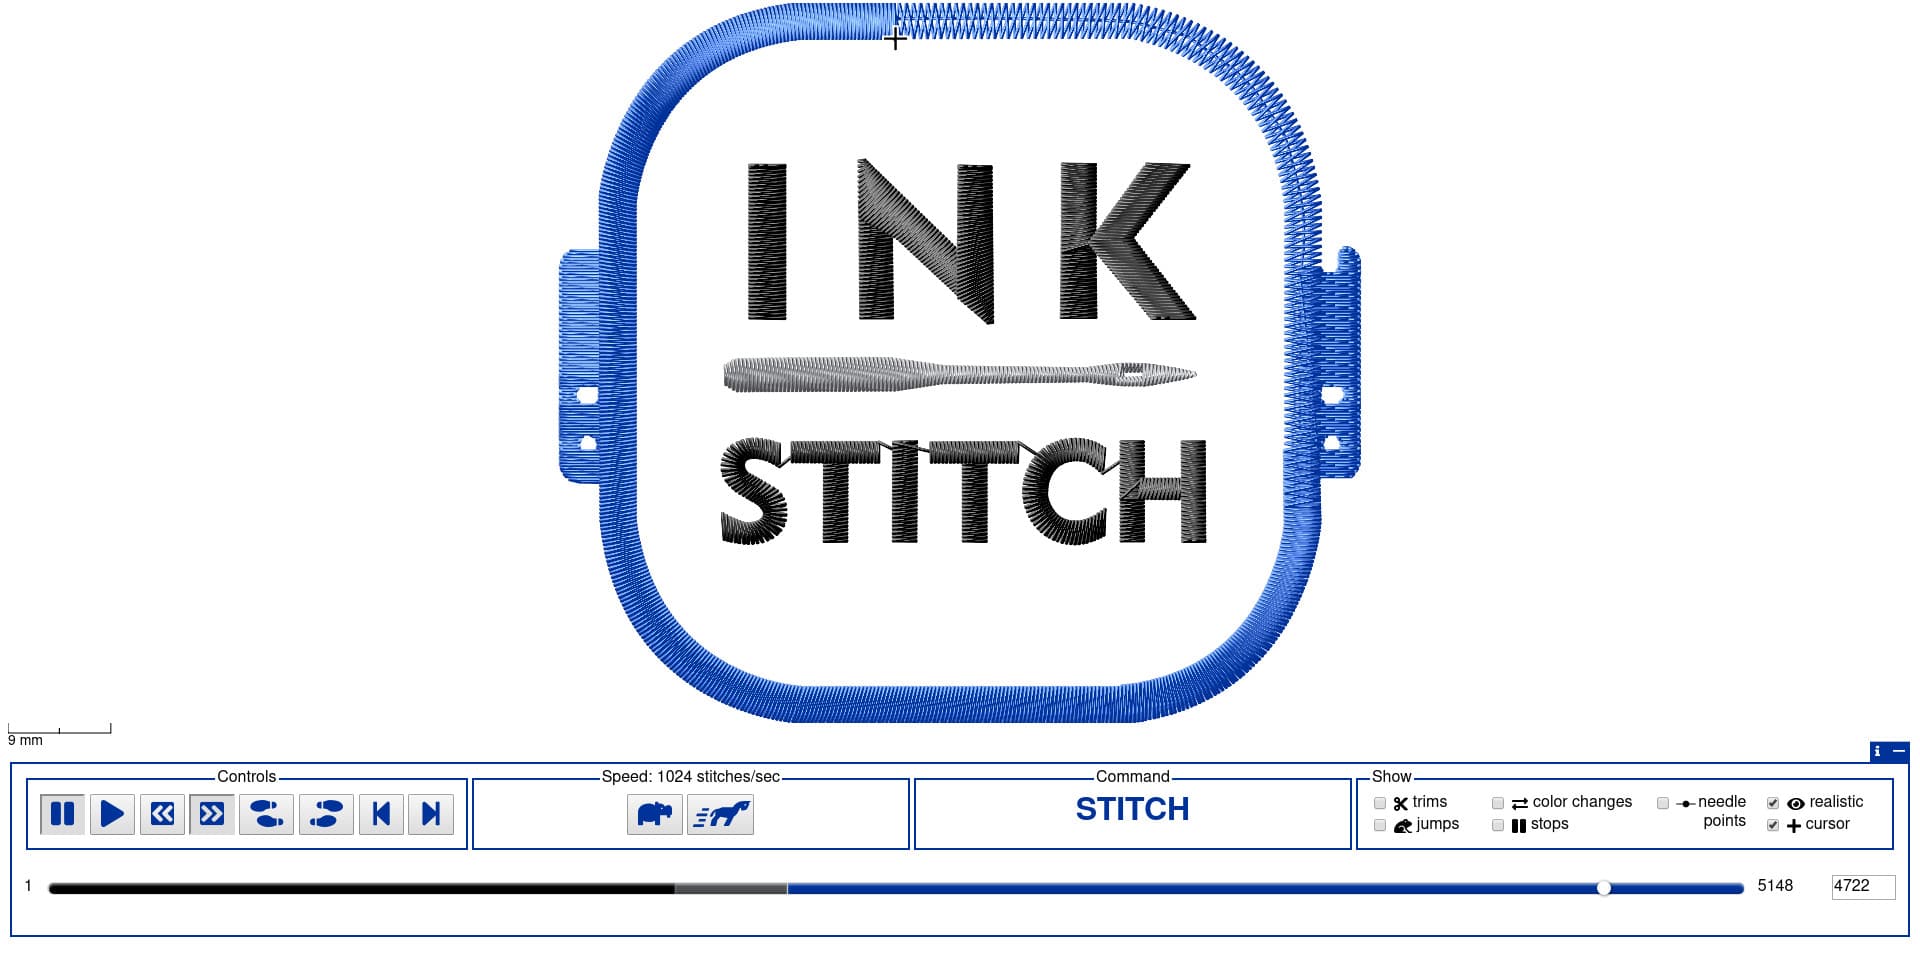
Menu Extensions -> Ink/Stitch -> Visualize and Export -> Simulator/Realistic Preview (Angl: Visualize and Export-> Simulator/Realistic Preview) will display a stitch simulation. This is a situation similar to the one we see when we parameterize.
Menu Extensions -> Ink/Stitch -> Export PDF generates a printable web page that includes the design and important stitching information.
If you check the “Realistic” box at the bottom of the simulator, a high quality simulation, such as that obtained with the visualization and conversion software, will be displayed.
It should be understood, however, that generating a “realistic” printed version can take some time on low-powered PCs.
1.6 Create the embroidery file
You can create a stitch file for a selection of specific objects, or for all objects. To create an embroidery file with the entire design:
Click in an empty space (to deselect)
File Menu -> Save a Copy (Angl: File->Save a Copy). Please never use accented or special characters in your folder or file names, as most embroiderers do not accept them.
Select the format of your machine. If you are not satisfied with the result, select a popular format such as Tajima (DST), then use a free converter to convert your file to a proprietary format.
Select a folder name where you can find your files.
Note that it is also possible to preview stitches with Ink/Stitch -> View & Export -> Preview Stitch Plan
1.7 Parameterization of fillings
Recall that the principle of modern machine embroidery is to define shapes and then instruct the machine how to generate embroiderable stitches. InkStitch can produce several types of stitches from an SVG object: various straight stitches, wavy stitching, simple zigzags, satin columns and tatami fill, by outline or guide line.
A dot area filled with tatami, from an SVG path with a defined fill
Running points (lines), from dashed stroke (SVG path with dashed outline)
Wavy embroidery (filling with lines), from one or two dotted strokes
Zig zag, from stroke (SVG path with outline)
Two objects (one box and one zig zag/line) of a path having both a fill and an outline (avoid)
Satin stitches, from a path with two lines as subpaths. Either these two lines must have the same number of points, or the path contains direction traverses (also called “direction lines” or rungs”).
Summary :
2 Area fills (mats)
Since version 2.2. Ink/Stitch makes it possible to embroider different types of fillings in the narrow sense of the term, which we also call “mats:
Tatami Automatic filling. This is the default fill as in all embroidery software.
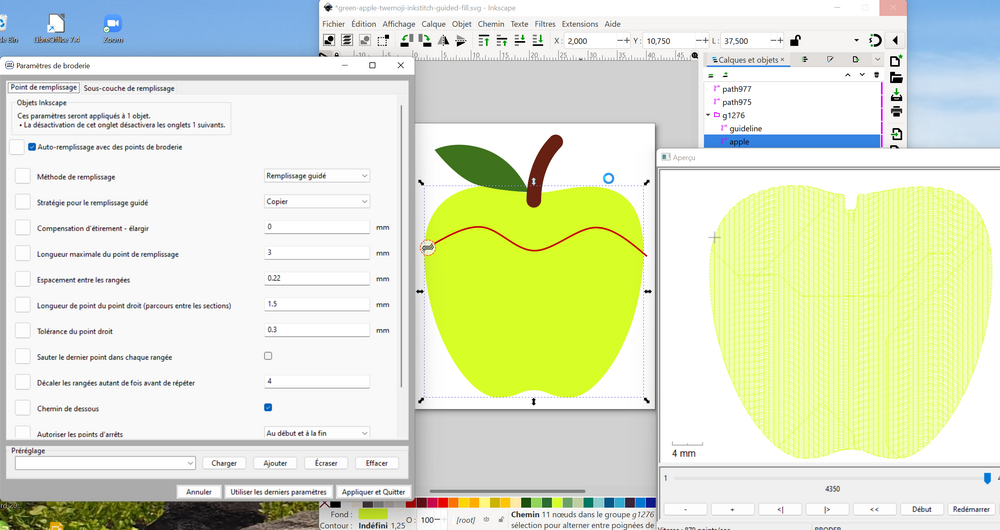
Guided filling
Fill according to contour
2.1 Embroidering a tatami filling
(From path with fills to an embroidery area)
SVG fills can be configured to create areas filled with a “tatami” type pattern. You can either accept the defaults (recommended for absolute novices) or change all settings.
To configure a fill:
Select a path that has a fill and no stroke (e.g. a circle or a red or green circle below).
Open the settings popup: Extensions -> Ink/Stitch -> Settings
The settings window will have three tabs
Auto-fill: Try changing the fill angle. You can also add cuts if supported by the stitch file.
Autofill Underlay: Add an underlay, i.e. stitches that will be sewn under the design. This will add stability and a bit of a 3D effect. Don’t make it too dense.
Fill: an alternative to autofill (avoid)
Parameters (also read the official manual or its English version!)
Autofill with embroidery stitches: Must be checked!
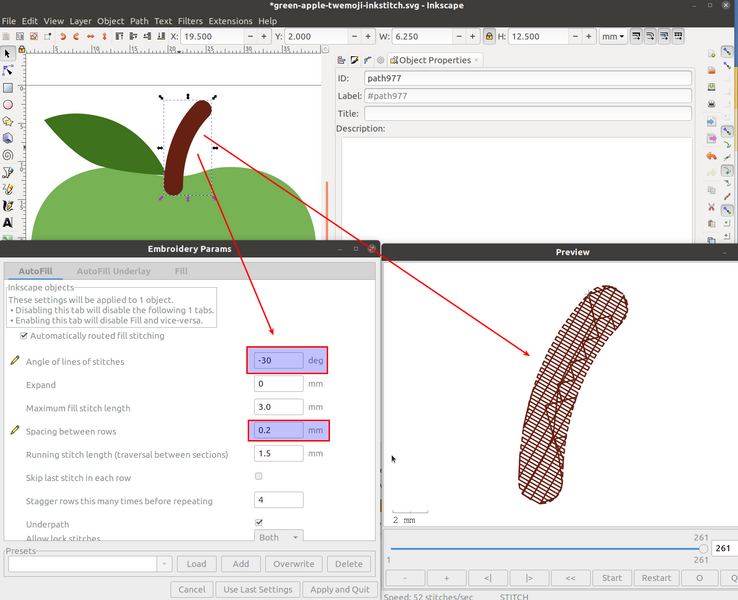
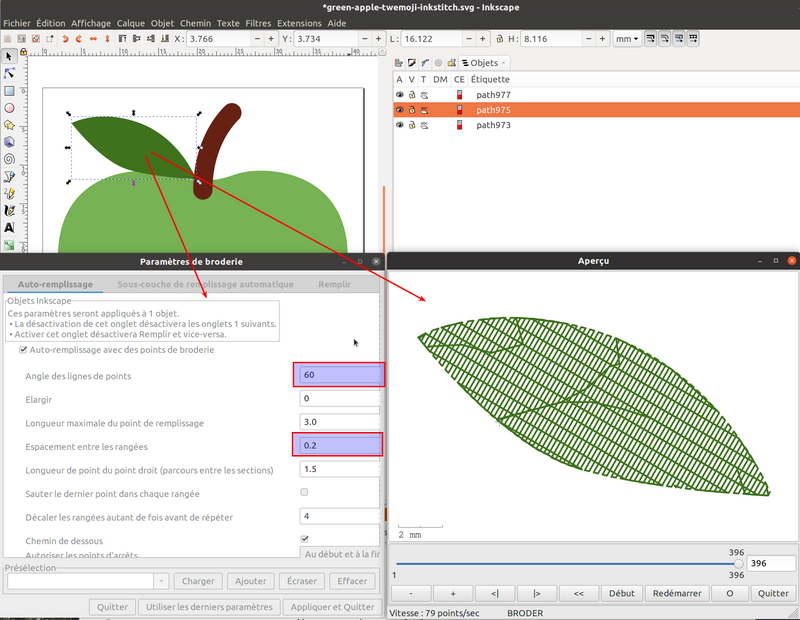
Angle of stitch lines: By default the tatami is stitched horizontally. It is advisable to vary the direction of the paths.
To broaden. Add stretch compensation in the direction of the lines. For a woven fabric, we recommend adding 0.3mm
Maximum fill stitch length: It actually defines the length of the fill stitch. You can keep the default (0.3mm) or go down to 2mm for a 40 weight yarn. Between this value and the repeats, you can get a different texture effect.
Row Spacing: Sets the distance between rows and mainly determines the density. For a yarn of weight w.t. 40 standard, we recommend between 0.25 (light) and 0.2 (normal)
Straight stitch stitch length (path between sections: We recommend leaving the default. Otherwise between 2 and 3 for a standard thread. This affects the embroidered lines to pass from one place to another, especially the path below .
Skip the last stitch in each row: Leave default (unchecked), unless you want to lighten the embroidery
Shift rows this many times before repeating: Sets the repeat of a row (the stitches are distributed at an equal distance, but do not start in the same place at the 2nd stitch at the beginning of the row. Allows you to vary the texture a little
Bottom path As a general rule, it is absolutely necessary to tick, otherwise the embroidery will be unstable and we will also see through.
Allow breakpoints Leave checked for “normal” embroidery.
Here are screenshots of the Ink/Stitch 2.0 version, once for the English interface and the other for the French interface.
Underlay management.
We recommend leaving the default settings to start with.
Parameters for the underlay:
Filling angle By default (empty field) it will be embroidered orthogonally
Offset Relative Maximum stitch lengthBy default, the autofill value
Spacing between rows of stitches by default, for knits you can densify a little.
skip last stitch in each row leave unchecked
Path from below as it will stabilize the fabric, it should be left as a rule.
To create extra lightweight embroidery:
check skip last stitch in each row for both infill and underlay
Uncheck Path below for both. The links will be made along the border.
Space the distance between the rows (0.5 for example).
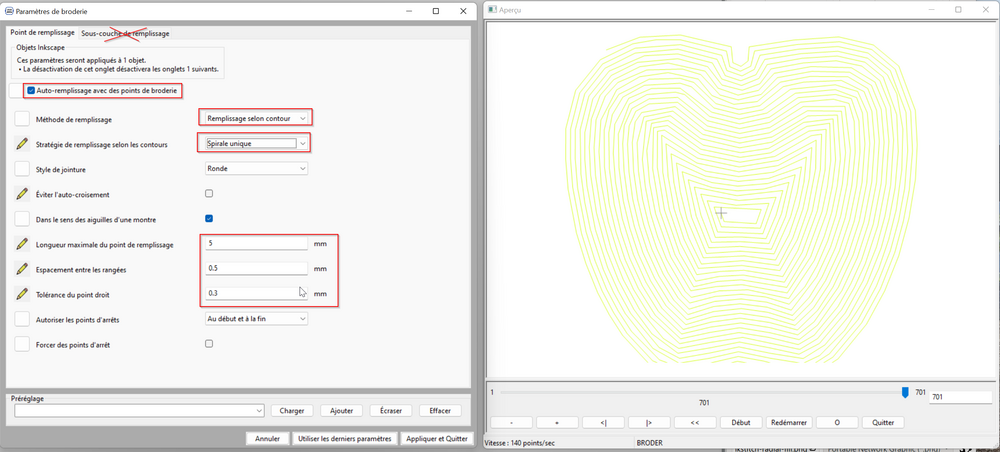
Contour fill (Angl. radial fill)
2.2 Contour filling
This filling is not yet very successful for us (version 2.2) it is better to use the wavy outlines (introduced later in this article). That said, it is probably interesting for embroideries with thick thread (w.t. 30 and 12) and without underlay or underpaths. Here is an image of a setting for thread 12 to embroider with a topstitch needle 100. So for a dense design for thick thread:
3 Digitizing lines with straight stitches
To get a thin straight stitch line, you need to draw an outline (also called a “line”) and dot it. In InkScape 2.2 (and higher) you can use “strokes” in two ways:
Embroider lines with straight stitches
Create wavy embroideries
3.1 Embroidering straight stitches
A stroke (also called “outline”) is embroidered by default with simple zig-zag stitches. This mode is to be avoided, because ugly, but if you want to, opt for a line width of 2 to 4mm. If you want to embroider a straight stitch or a triple stitch, you have to transform the line into dotted lines in the Inkscape Object panel -> Fill and Stroke -> Stroke Style Tab.
Set the thickness of the line to 0.2mm (about the width of a 40 thread) or 3-4 mm if you plan to embroider a triple stitch or repeat the line. This helps you better visualize the result, but does not affect scanning.
Use a fine dotted line or with close lines.
Fill Parameters
Straight stitches along paths (must be ticked!)
Repeat: Number of times to stitch the path (2 makes it possible to go back and forth, useful for connecting the branches of a star or a tree)
Number of repetitions of the triple stitch: 1 = front, back front, a value of 2 will quintuple (caution)
Straight stitch length
Zig-zag spacing (ignore, no use)
Allow Breakpoints: Use defaults unless otherwise specified.
Beware of stacking effects. A repeated path with a triple stitch causes the needle to poke 4 times in the same places.
Straight stitch settings for Ink/Stitch
3.2 Manage paths with fill and outline
Objects that have both a fill and an outline allow adjustment of both of these settings, i.e. the contextual setting will present the combined fill and outline settings tabs. But as the line is sewn first, we do not recommend using this possibility. So instead, do the following.
Use Path -> Outline to path function.
Alternately:
Copy/paste the object in place
Remove fill from one of them
Remove the stroke from the other.
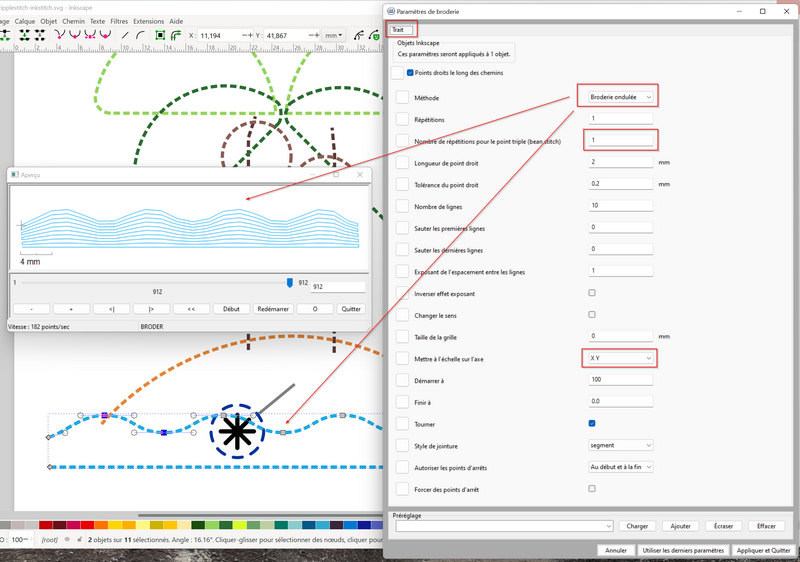
3.3 Filling by wavy embroidery (ripple stitch)
Creates wavy embroideries from dotted lines. As the official manual explains, “The wavy embroidery is both straight stitch and filling: it behaves like a straight stitch (it can be executed in triple stitch for example), it is defined from a line , but it produces on arrival an embroidery that extends over a surface. Used loosely, the result looks like waves, hence the name
4 Miscellaneous operations
Beyond the principles of setting backgrounds and outlines introduced above, it is useful to know and use other functions.
4.1 Sort objects
The order of the objects to be embroidered must be sorted before committing to object transformations or other adjustments.
Open Objects Panel (Object Menu -> Layers and Objects) (formerly Object -> Objects)
Items at the bottom of the stack are stitched first. Using groups or layers (same SVG object as a group) has no effect, ie. when Ink/Stitch falls on a group, it will first stitch the element that is at the bottom of the group. We therefore advise against the use of layers and groups for simple drawings.
You can move the objects up or down with the mouse (mouse-drag), or use the arrows (preferable)
To find your way around the pile of objects, we recommend naming the most important objects: Double-click on the object and enter the new name.
4.2 Attaching special commands
Inkstitch allows you to attach commands to an object. For instance :
By adding a “trim the thread” (TRIM) code to an object, the machine will cut the thread. A single-needle machine should then also stop, but not a multi-needle machine. Useful for people who don’t like to cut threads with scissors.
Adding a STOP code to an object will stop the machine. Please note that this does not work with all embroidery formats.
Start and end positions can be defined. Sometimes necessary to successfully fill the tatami.
Use Menu Extensions -> Ink/Stitch -> Commands and explore especially Attach commands to selected objects
Attach commands to selected objects.
Attached commands will be visualized with SVG drawings – which of course will not be stitched.
4.3 Adjust document size
Although not necessary for successful embroidery, we recommend adjusting the page size to the embroidery or hoop and for three reasons:
The pattern will display correctly in the browser
It allows efficient use of keyboard shortcuts
4 – zoom on the pattern
5 – zoom on the page, so also show the empty space around the design
The size of the pattern will be appropriate
There are two logics:
Either we adjust the size of the document to your frame (recommended if you are drawing a pattern, but zooming with the 4 and 5 keys will work less well)
Either we adjust the size of the document to the drawing (recommended if you import a drawing). You can quickly adjust with the shortcuts CTRL-A, then CTRL-SHIFT-R.
1) Procedure to adjust the document size to your frame
File Menu -> Document Properties
Enter frame values in Custom size
2) Procedure to adjust document size to pattern size:
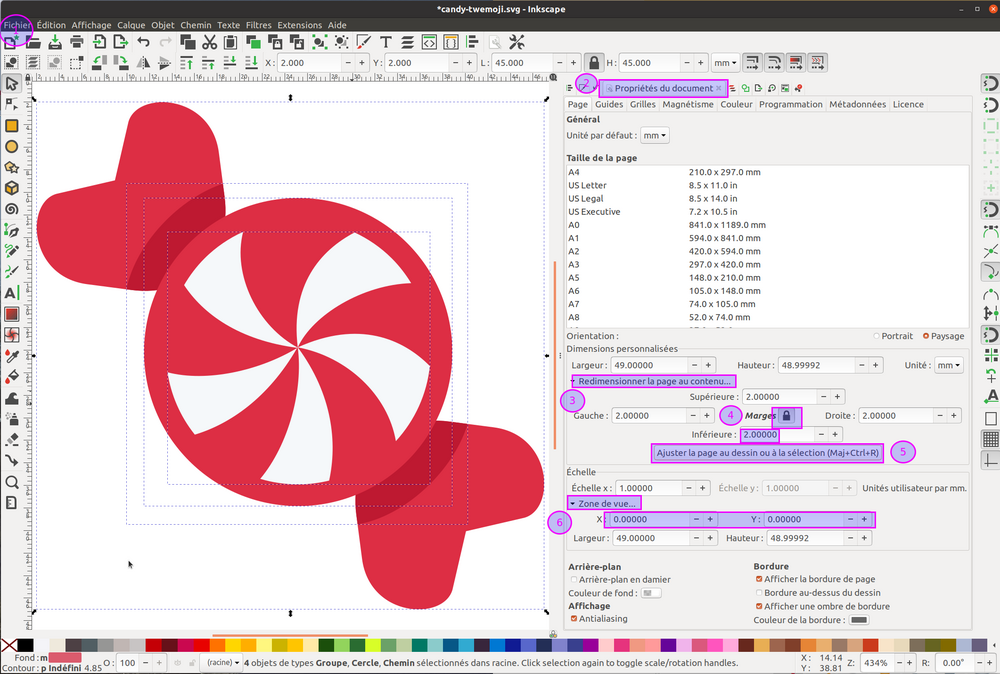
All (or nothing) select CTRL-A, then Menu File -> Document properties… (Angl: (File->Document properties…)
Open Resize page to content (Engl. Resize page to content …)
Define a margin (we recommend 1 to 2 mm)
Click on Resize page to drawing or selection
Check that there is no View port. X and Y must be 0, and the width and height must match the document size defined above.
Shortcut/Quick Shortcut: Ctrl-Shift-R to fit page to selection (Engl. Ctrl-Shift-R)
Steps to adjust the document size
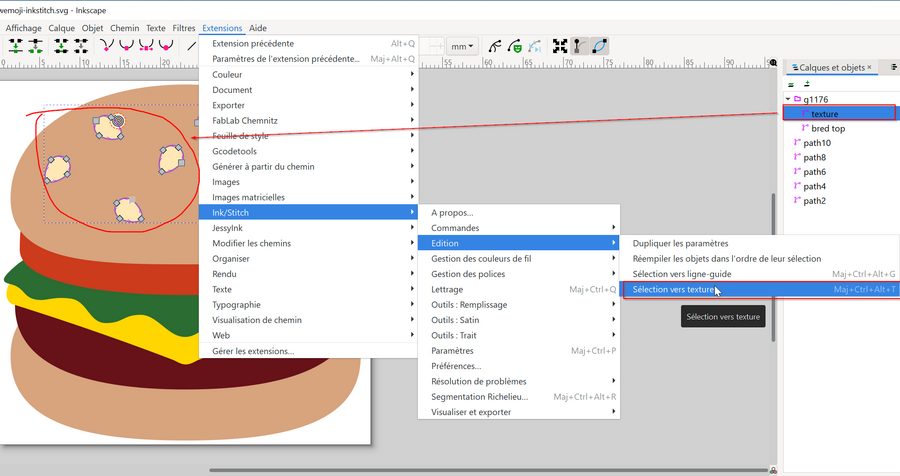
burger with texture
4.4 Modifying a fill with a texture
It is possible to add or remove points from a fill, a function called “texture” in the French version. To obtain a texture, you must first create a drawing with an outline or a fill or both. The outline points will be added and the fill points will remove points from the object to be textured.
We can use textures with several types of filling. We recommend starting with the tatami fillings. Here is an example that changes the tatami for the bread of a hamburger emoji.
We first draw some small circles with contour and filling
We group this new path (texture) and the object to be textured
In Ink/Stitch -> Edit -> Selection to texture we define the path with the circles as texture
We can also regroup afterwards. The only constraint is that the texture must be the first element from the top in the group.
Declare a path as a texture
Read InkStitch – fill textures for more details.
4.5 Summary
Ink/Stitch provides good basic functionality for creating embroidery files. Its integration in InkStitch has advantages:
One can enjoy the features of a free and powerful drawing tool
InkScape is also used for cutting and graphic art, so many people are familiar with this software.
