Introduction
This article aims to show how one can adapt a design available as a machine file (PES, DST, JEF, etc.), in particular
enlarge the pattern more than 10%
decrease the pattern more than 10%
remove or add objects
move or rotate objects
We don’t describe how to work with design files!! Typically, you are in the situation where you have purchased a pattern and you want to adapt it a bit, without having access to the design file.
1.1 Reminder of the principles
The different machine embroidery formats contain the stitches to be embroidered as well as other instructions for the embroiderer. These stitches are usually created with design software like InkStitch or Stitch Era from embroidery objects. Read Machine Embroidery and then Fundamentals of Digitizing in Machine Embroidery to better understand the details of digitizing.
An embroidery object, as it exists in a design file, is composed:
of the definition of a shape
parameters that define its filling with embroidery stitches (shape, density, directions, etc.). Read Stitches for details.
something. additional information like thread number, bartacks, cuts, etc.
With this information, the software creates blocks of points (or packets of points) which are found in the machine files. For each sequence of objects separated by a “wire break” or wire change command, a different block is created. The objects to be embroidered disappear and (except in the special case of hybrid files such as PES) the design cannot be resumed. You can just modify the blocks of stitches which are arranged by color as you see them elsewhere in the control screen of the machine.
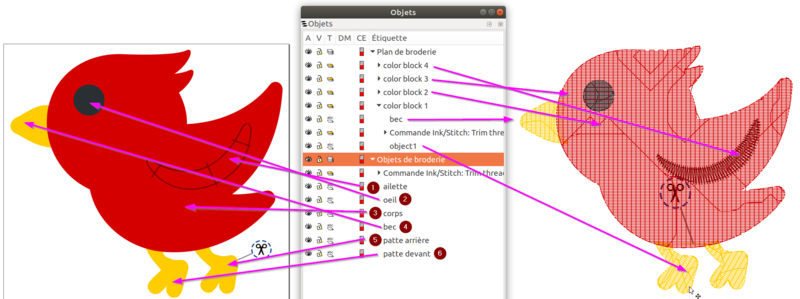
Here is the example of a scan of a “Bird” emoji from the Twemoji font made with InkStitch. The following image shows both the embroidery objects and the embroidery plan (stitch blocks etc.) generated from these objects. Let’s take a look at the architecture of this pattern:
The object “Bird” is composed of six objects: in order to embroider these are “leg in front”, “leg behind”, “beak”, “body”, “eye” and “fin”. The fin is a satin object and the others are areas set up as simple fills. There are no lines that we would have parameterized as straight points. With these six objects one can create the embroidery, ie. say a machine file in a proprietary format like PES, JEF, or DST that will contain blocks of stitches to embroider. On the right, we see a simulation of these blocks, called an “embroidery plan” in InkStitch. It is seen that there four color sections. The first embroidery block #1 and displayed in yellow contains two embroidery blocks, because we had put a “TRIM” (instruction to cut the thread”) on the back leg. So the two legs are in “object1” and the beak in “beak”
Embroidery Objects and Generated Stitch Blocks
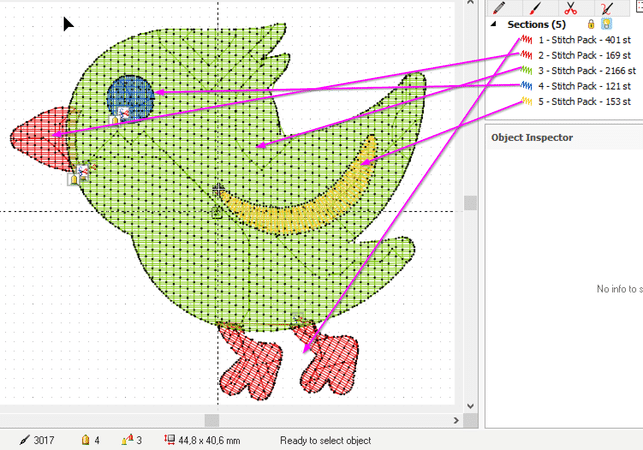
If you open a machine file with design software or viewing/resizing software, you see the stitch blocks. We chose to show the industry standard DST, the most reliable format, but which does not record the original colors. We see that Stitch Era only displays “Stitch Pack” (blocks of stitches), so the legs are in the first, the beak in the 2nd, the body in the 3rd, etc. It’s the same for the free software MyEditor which we strongly recommend to install at home.
Generated point blocks seen in MyEditor
In each of these three software one can manipulate the blocks of points, including moving them, rotating them, changing their size, and finally editing the points, namely adding, destroying, or modifying the position of the points. The articles InkStitch – manual stitches and Stitch Era – creating and modifying embroidery objects introduce more details about these techniques. In the strategies that will be described later we will take advantage of this possibility.
1.2 Hybrid machine/design files
There are machine files that double as a design file, including PES, ART, and EMB. In other words, these files are used both by the designer using very specific software sold by the manufacturer and to publish the embroidery stitches read by the machine.
PES files contain not only the embroidery stitches (encoded in the “PEC” section), but also the embroidery objects created at the design level with PE Design. It is therefore possible to re-edit them with the PE Design software sold by the Other software simply ignores this information, that is, a PES file may or may not contain embroidery objects, but usually does not, because professionals do not work with PE Design.
1.3 Three techniques for adapting a pattern
We identified three techniques that we will detail more or less in this article.
Use Embroidery Machine Features to Make Slight Changes
Change yarn (a thinner yarn to decrease and a thicker yarn to increase the size)
Use visualization software (MyEditor or TrueSizer) that knows how to recalculate the points.
2 Handling on the machine
The embroidery machine allows the following operations before embroidering
slightly decrease or increase the size of a pattern (5 to 10%)
rotate
horizontal or vertical inversions
shift
Before embroidering, you can also add other patterns (other imported files or machine objects, in particular lettering)
During the process, you can decide not to embroider certain sections.
You cannot edit or manipulate individual sections. That said, the Jef+ format allows it in theory on Janome/Elna machines and the PES and ART formats would also allow editing on the machine, to check if this exists on certain models….
3 Editing stitches with design software
Almost all design/digitization software (so you need the “digitizer” level) allow you to edit a machine file and do the following operations in particular
Change the size of a point block (at your own risk if you exceed 10%)
Rotations and displacements (without great risk)
Adding and removing points (requires technical skills). These operations are sometimes necessary if a purchased object has defects or other problems, for example you think that an eye is too round and that it must be lengthened….
Adding embroidery objects (without any risk)
Removal of point blocks.
After editing, simply save the file again in the desired machine format (the same or another). Here, we show how to do these operations in InkScape/InkStitch.
3.1 Rotation and displacement
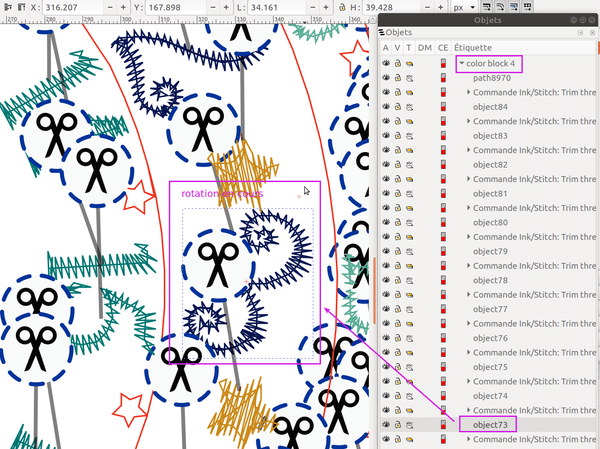
The following image shows that it is easy to manipulate objects as long as they are well separated by wire cuts. This was the case for the ITH clock from Alice Broderies.
The dark blue numbers are in color block 4 and one can choose number by number and then rotate the object. The “3” corresponds to stitch block #73.
Point block (number “3” being rotated)
We also had to slightly move some numbers following the rotation
3.2 Size change
To change the size of the entire pattern or of a single element, we strongly recommend using the menu bar, as this avoids distorting the proportions. But remember that you shouldn’t change the size by more than 10% unless you plan to embroider with a different weight yarn! This topic will be discussed in a subsequent section. Here we only show the technical operation.
Let’s go back to our bird. We act as if we did not have the design file in SVG and we therefore open a machine file, in this case the PES.
In InkStitch, the thread break indicators should be moved/decreased (so as not to mistake the resize). Warning: First display the “objects” panel, then check that you have selected the “Command Ink/Stitch: Trim thread after ….” path.
Then select everything with CTRL-A, then change the size in the navigation bar, after checking that the reports are locked and that you have really selected all the objects.
Our birds are 45 x 41cm in size which is our standard for embroidered emoji. To reduce them to 65% you must therefore enter 45 * 0.65 = 29cm in the L field. The result will be an identical drawing except for the distances between the points and you can save it as such (CTRL-S). Warning: this object will no longer be embroiderable without changing thread weights, read the next section….
Reduce the size of a machine embroidery design
3.3 Delete a point block
Just select it, then press DEL
4 Increase or decrease a pattern by changing yarn
As explained in detail in the article Embroidery thread, family embroidery is almost exclusively centered on size 40 threads which are embroidered at a density of approximately 4 to 5 threads per millimeter. Knowing that a thread of weight 12 is about a double diameter and that we typically put 2.5 threads per mm and that the thread of weight 60 is embroidered with 7 threads per mm, we can therefore increase or decrease much more than 10% a pattern while keeping the stitches. Choosing the right needle is crucial:
For the thread 60 you need a needle 60 H (pointed). The threader should never be used with this size. It will be by hand!
For yarn weights 30 and 12 you need Topstitch needles of size 90 and 100 respectively, i.e. needles that are not only wider but also have a long, wide eye. .
Related Posts
Discover relevant articles, tutorials, and tips to improve your skills and explore new techniques.
Stay inspired and connected to our embroidery community.
