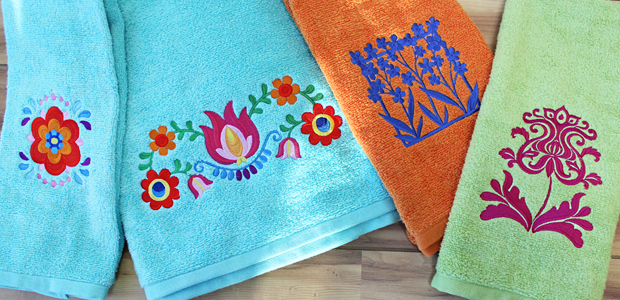
There are two types of towels available for you to embellish. The first is a standard banded towel shown upper left and the second is a trimmed decorative towel. Buying a towel with existing trim is more luxurious right away and requires less decorative work. Unfortunately, there aren’t that many different trimmed towels to choose from. We will show you later in this tutorial how to create your own trim.
After selecting the proper design, placement on the towel is critical. Now, you can technically place the design any place you want, but here are some guidelines on how we do it and how most
decorators do it. The bottom of the design should be between 1.5” and 2” from the towel band or trim line of the towel. If you are adding your own trim it is easier to embroider the towel first. Here is a step by
step guide on proper design placement for a bath towel.

Open the towel up for step four and elongate the chalk line for easier visibility. Print out your design onto a piece of paper and trim around the design to get a better idea of what it will look like placed on the towel. Most embroidery software shows a center point on the design, illustrated in step six, this is very important for placement. If the center point is hard to see, make it darker with a marker or pen.

The first three steps involve finding the center of the towel. Steps one and two show us folding the towel in half lengthwise to find the center. After the towel is folded, step three shows us marking the center line with chalk.

Step seven show us placing the printout of the design on the towel for placement and step eight shows us lining up the center line on the printout with the chalk line. After we find the proper placement we hold the printout in place with one hand and hold a ruler down across the horizontal center line of the design.

After the ruler is in place fold the printout over the ruler and draw your horizontal line. This line will cross over your vertical center line giving you the spot to line up the presser foot of your embroidery machine. The final step before hooping is to darken the chalk lines for easier visibility. Your towel is now marked for perfect placement.

Adding trim to towels can take an ordinary towel and make it become a thing of beauty. Most towels that you will find in a store have a band across the bottom. It is very difficult to find towels without the band. If you don’t want to see the band when you display the towel it is very easy to cover it up with trim. The first step as illustrated in step one is to measure the band of the towel. This is very important when going to the fabric store to select trim. We recommend selecting the trim you like first and than matching the colors in your embroidery design to the trim. To successfully apply trim to the towel you will need a sewing machine or access to someone that has a sewing machine.

The first step as illustrated in step one is to measure the band of the towel, this is very important when going to you fabric store to select trim. For this towel we selected a two inch ribbon trim that fit perfectly in the band. Sew it unto the towel with a straight stitch, wrap a half inch of the ribbon around the back of the towel for a nice finished edge. If you want to further embellish the towel you can place a tassel trim directly over the ribbon this really makes the towel look like a work of art. Tack the tassel trim down with a walking stitch as well. Remember always do the embroidery first. Hooping the towel with all of that trim can be difficult.
Hooping Tips
Use a sturdy tear away stabilizer when hooping towels. People may turn them over and you don’t want to see cutaway when they do. Use a water soluble topping for the surface of the towel. This prevents the design from sinking into the terry. The easiest way to do this is to hoop all three together, stabilizer, towel and topping. Avoid using sticky backing when embroidering towels, Sticky backing doesn’t create proper tension and can cause problems when the design is running, especially on big designs.
Related Posts
Discover relevant articles, tutorials, and tips to improve your skills and explore new techniques.
Stay inspired and connected to our embroidery community.

Everything is very open with a very clear description of the challenges.
It was definitely informative. Your site is very helpful.
Many thanks for sharing!
Very shortly this web page will be famous among all blog users,
due to it’s fastidious content
irst off I would like to say superb blog! I had
a quick question in which I’d like to ask if you do not mind.
I was curious to know how you center yourself and clear your thoughts before writing.
I’ve had difficulty clearing my mind in getting my thoughts out.
Excellent article. Keep posting such kind of info on your blog.
Im really impressed by your site.
Hello there, You’ve performed a fantastic job. I will definitely digg it and individually recommend to my friends.
I’m sure they’ll be benefited from this site.