Stitch a Spooky Friend: A Step-by-Step Scarecrow Embroidery Tutorial
Scarecrows, those guardians of the harvest, add a touch of whimsy and folklore to the fall season. Capturing their rustic charm in a piece of embroidery is a delightful way to celebrate the changing leaves and create a unique decoration for your home. This step-by-step tutorial will guide you through embroidering a friendly scarecrow, perfect for both beginners and seasoned stitchers.
Materials:
- Embroidery hoop (size of your choice)
- Fabric (cotton or linen blend works well)
- Embroidery floss in various fall colors (browns, yellows, oranges)
- Embroidery needle
- Pencil and eraser (optional, for tracing)
- Embroidery scissors
- Scarewcrow template (optional, you can find free ones online or draw your own)
Steps:
-
Prepare your fabric and hoop:
- Cut a piece of fabric larger than your embroidery hoop.
- Center the fabric on the inner hoop and tighten the outer hoop to secure it taut.
- If you’re using a template, lightly trace the scarecrow outline onto the fabric using a pencil. Erasure marks will easily disappear once you start stitching.
-
Embroidering the Head and Body:
- We’ll begin with the scarecrow’s head, using a backstitch. Backstitch is a great stitch for outlining shapes as it creates a neat and defined edge.
- Choose a brown or tan floss color for the head. Thread your needle and tie a knot at the end.
- Starting from the inside of the head outline, bring the needle up through the fabric. Push the needle back down a few millimeters away, leaving a small tail on the underside.
- Bring the needle back up through the starting point, catching the tail underneath your needle with the thread. This creates a secure stitch.
- Continue backstitching along the head outline, making small stitches about 2-3 mm apart.
-
Adding Facial Features:
- Time for the eyes! French knots are perfect for creating those characteristic button eyes.
- Thread your needle with a contrasting color, like black or blue.
- Bring the needle up from the underside of the fabric where you want the eye to be.
- Wrap the thread two or three times around the needle, holding it taut with your thumb and forefinger.
- Push the needle back down through the fabric close to where it came up, keeping the wrapped thread secure.
- Gently pull the needle through, leaving a small, looped knot on the fabric surface. Repeat for the other eye.
-
Stitching the Patchwork Body:
- Now comes the fun part: creating the scarecrow’s patchwork body. We’ll use a variety of brown, yellow, and orange floss colors to represent different patches of fabric.
- You can use a straight stitch or a satin stitch for this section. Straight stitch is a simple up-and-down motion, while satin stitch creates a smooth, filled-in area.
- Choose a color and start stitching within the body outline. You can create random patches or define separate sections for a more detailed look. Feel free to experiment with different stitch lengths and directions to add texture.
-
Hair of Straw:
- To create the scarecrow’s straw hair, we’ll use a detached chain stitch. This stitch creates loopy strands that resemble wispy straw.
- Choose a light brown or yellow floss color. Bring the needle up from the underside of the fabric where you want the hair to start.
- Leave a long tail of floss (around 2 inches) on the underside.
- Hold the floss down with your thumb and make a small loop above the needle on the fabric surface.
- Push the needle down through the base of the loop, catching the floss tail underneath.
- Pull the needle through, creating a small loop on the underside.
- Repeat this process, making a chain of loops extending upwards for the hair. You can vary the loop sizes and directions for a natural look.
-
Hat and Details:
- Time for the hat! Use backstitch to outline the shape of the hat brim and top. You can choose a simple cone-shaped hat or get creative with a floppy brim.
- Use a few straight stitches to add a simple cross shape for the scarecrow’s mouth.
-
Finishing Touches:
- Once you’re happy with your stitched details, tie a knot with the remaining floss on the underside of the fabric to secure it.
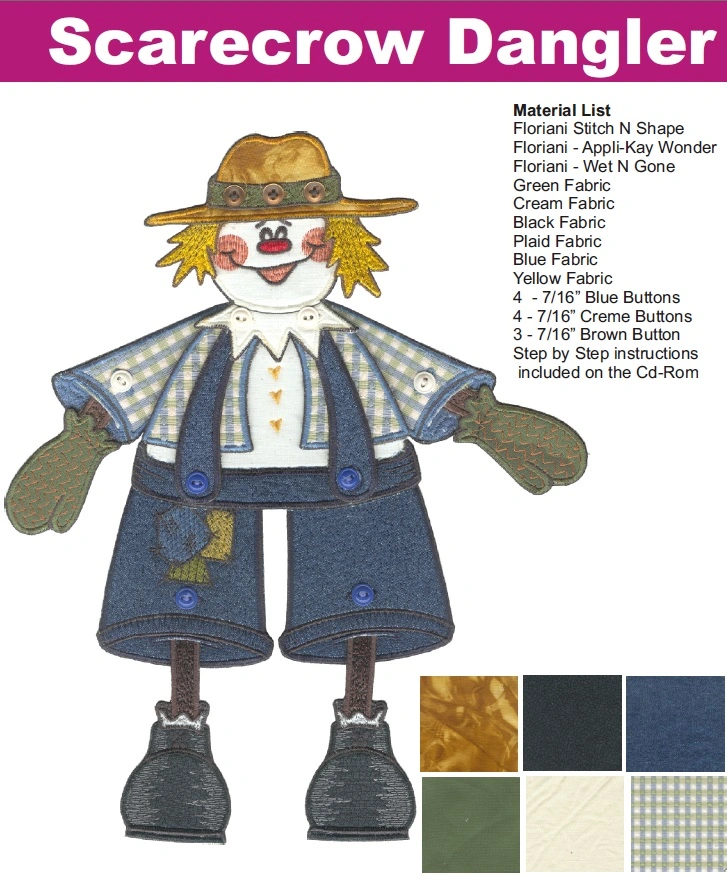
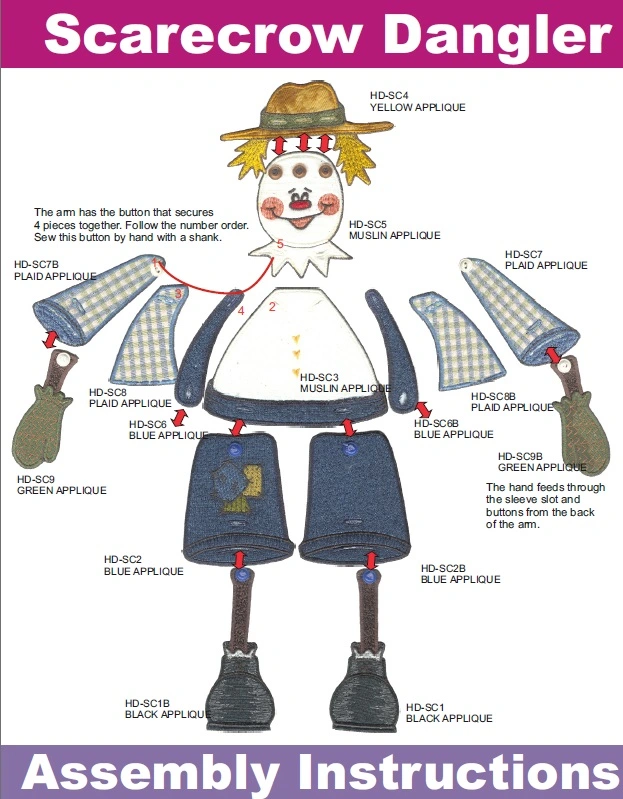
How do you know where to place the buttons or button holes? We used a very simple system to make this as easy as possible. We include on the next two pages a picture of the finished design and a breakout guide. The breakout guide shows you the colors of the appliques, and the colors of the buttons. As to where they go, each piece will have either both of
these guides or only one of them depending on the piece. If you see a small crosshair in the design, that means a button is centered right on the crosshair. If you see a button hole,(they have been digitized into the design) then you simply have to cut the hole open with a seam ripper or buttonhole cutter too.
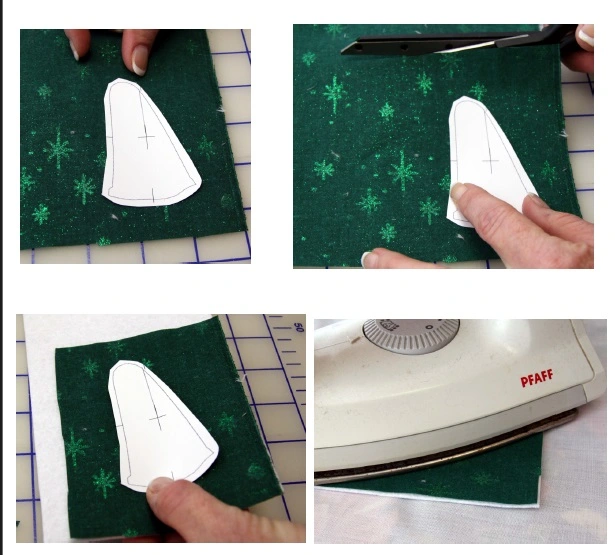
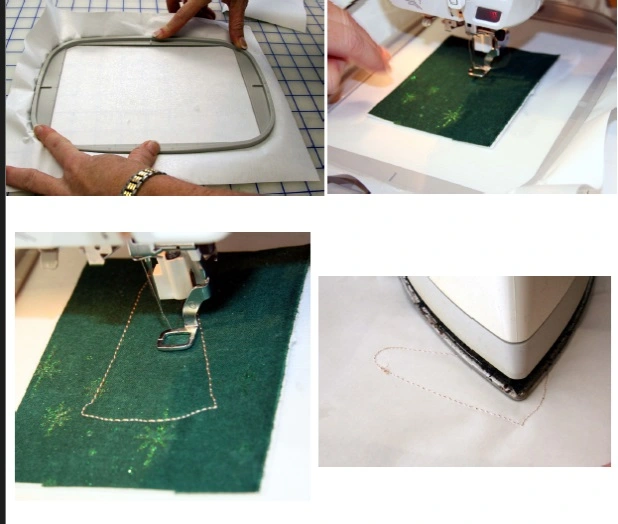
After our fabric is fused it is time to create our applique piece. Hoop a piece of the Appli-Kay Wonder by itself in your 5”x7” hoop. The Appli-Kay Wonder is peel away on one side and fusible on the other side. For this step the paper side of the Appl-Kay Wonder is facing down in your hoop. You will be able to see the fusible side of the paper. You will then place the fabric you have fused to the Stitch and Shape onto the Appli-Kay Wonder and embroider the Cut File for the desired piece. The cut file will embroider a running stitch in the shape of the pattern. Once the pattern shape is outlined remove it from the hoop. Now you need to fuse the Stitch N Shape to the Appli-K Wonder. Turn it over and iron it. This step will fuse the Appli-Kay Wonder to the Stitch N Shape.
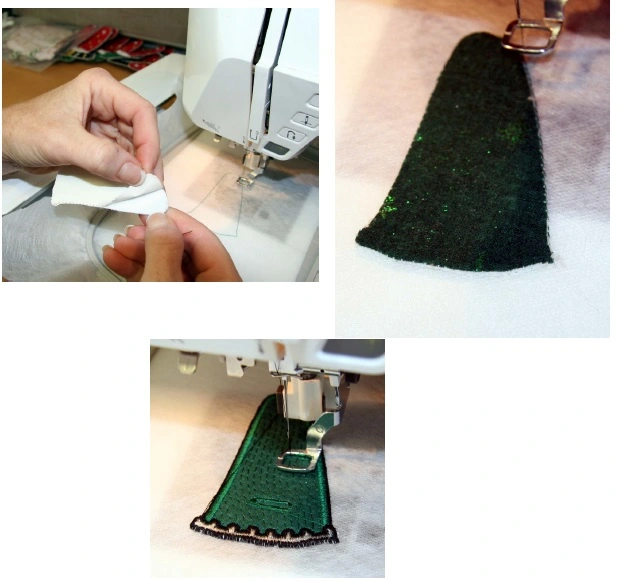
Start the embroidery file. The first step in the embroidery file will be an applique placement stitch. Once it embroiders this stitch stop your machine. Now you need to peel the paper off the back of your pattern to expose the sticky side of the Appli- Kay Wonder. Stick the applique down onto the Wet N gone where the outline indicates. Now you need to finish the rest of the embroidery design
Link for the pdf with complete tutorial and designs in multiple formats here Below
Related Posts
Discover relevant articles, tutorials, and tips to improve your skills and explore new techniques.
Stay inspired and connected to our embroidery community.
